How to Color Grade a Documentary: A Beginner's Guide
Color grading for documentary, explained for first-timers — balancing mismatched footage, building a look, and the realism that doc demands.
Color grading a documentary is a different job from grading a narrative film, and the difference trips up beginners. In fiction you control everything — lighting, lenses, schedule — so the grade is about pushing a look. In documentary you shot what you could, when you could, in whatever light the day gave you. Your footage is mismatched by nature. The first job of a documentary grade isn’t a look at all. It’s making it all belong to the same film.
This is a beginner’s guide, written assuming you’ll work in DaVinci Resolve, which is free to start and the industry standard for color. If you’re choosing tools, Resolve vs Premiere covers why.
The two stages: balance, then look
Every grade has two phases, and beginners rush past the first. Balancing (or “primary” grading) is making every shot correct on its own and consistent with the shots around it. The look (or “secondary” and creative grading) is the mood you apply on top once everything is even. Do them in that order. A look applied to unbalanced footage just spreads the inconsistency around.
Stage one: balance every shot
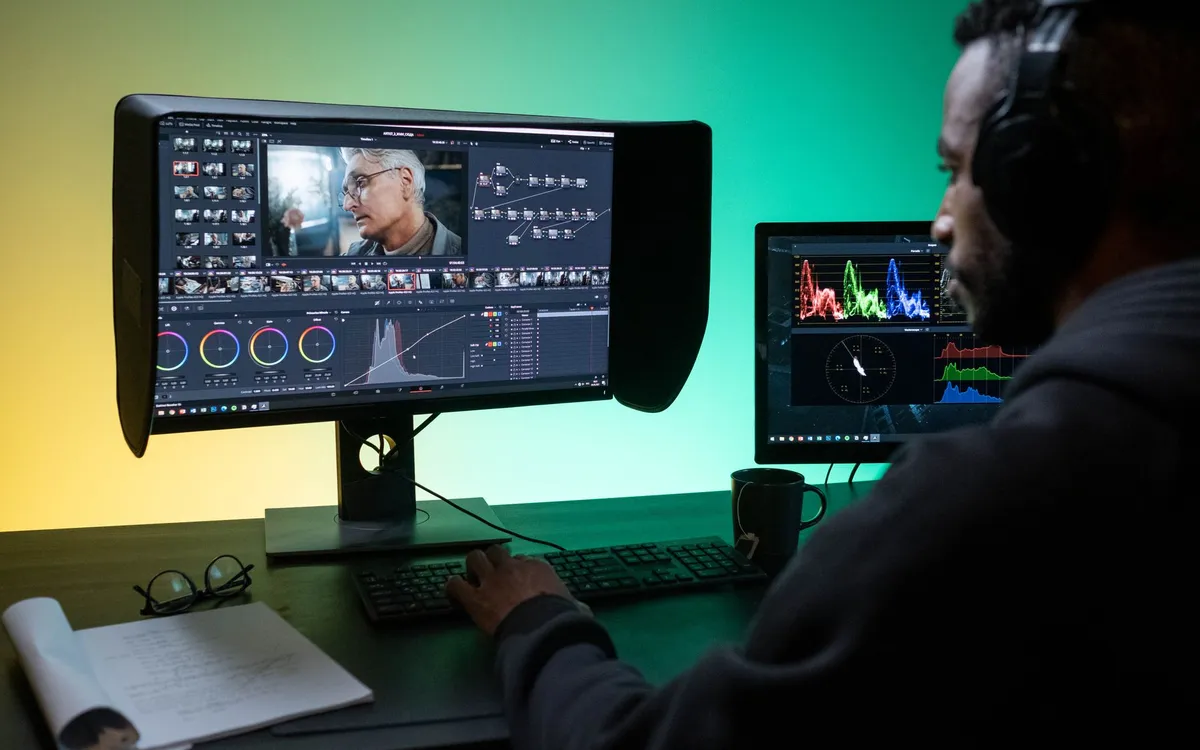
Start with your scopes, not your eyes. Eyes lie, especially after hours at a monitor. Resolve’s waveform, parade, and vectorscope tell you the truth about your image.
The basic moves, in order:
- Set black and white points. Adjust so the darkest part of the image sits near the bottom of the waveform without crushing, and the brightest near the top without clipping. This gives you full contrast range to work with.
- Fix the white balance. Neutralize color casts so whites are white and skin looks like skin. The vectorscope’s skin-tone line is your friend here — natural skin tones fall along it.
- Match shots within a scene. This is the heart of documentary grading. An interview cut between two cameras, or a sequence shot across a morning as the sun moved, has to feel continuous. Pick a hero shot, balance it, then match the others to it. Resolve’s split-screen and still-grab tools make this manageable.
Done well, stage one is invisible. Nobody watches a documentary and thinks “nicely balanced.” They just stop noticing the cuts. That’s the goal.
Stage two: build a look — carefully
Now you can add mood. But documentary asks for restraint that other genres don’t, because the form trades on a feeling of reality. A heavy orange-and-teal blockbuster grade on a vérité doc reads as a lie. The look should support the subject, not overrule it.
A few honest approaches:
- A gentle, consistent tone. A slight warmth, a touch of desaturation, a film-like contrast curve applied across the whole film for cohesion. Subtle is the watchword.
- Differentiating timelines or locations. If your doc moves between a cold city and a warm home, or between present-day and archival, you can use color to quietly cue the audience. This is a legitimate, audience-serving use of a look.
- Respecting archival. Old footage has its own palette. Sometimes you fold it into your look; sometimes you leave it distinct on purpose. Either can be right — just make it a decision.
Use power windows and tracking sparingly to draw the eye: lift a face slightly, hold down a bright window behind someone. But every secondary you add is time, and on a feature you have hundreds of shots. Pick your battles.
The realism trap, both ways
Beginners err in two opposite directions. Some leave everything flat and untouched, afraid that any grade is “cheating” — but unbalanced footage isn’t honest, it’s just unfinished, and it pulls the viewer out as surely as an over-grade does. Others discover the color page and crank everything into a music-video look that fights the material.
The sweet spot is footage that looks like one film, breathes naturally, and carries a tone you chose on purpose but can barely name. If a viewer notices your grade, you’ve probably gone too far — unless calling attention to the image is itself the point.
Practical setup notes
Grade on a calibrated monitor if you possibly can; a laptop screen will lie to you about color and brightness. Work in a room with consistent, dim, neutral lighting. And grade late — color is one of the last steps, after picture lock, so you’re not re-grading shots that get cut. It sits near the end of any sane post-production workflow, right before you prepare final deliverables.
You don’t need to be a professional colorist to give a documentary a clean, coherent, intentional image. You need scopes, patience, and the discipline to balance before you beautify. Start there, and the look takes care of itself.
How to Color Grade a Documentary: A Beginner's Guide
The editing, color and audio tools we use to finish films. Subscribing through our partner links supports independent coverage.
See editing softwareSome links on Indian Point Film are affiliate links: if you buy or subscribe through them we may earn a commission, at no extra cost to you. It never changes our recommendations.
Keep reading
DaVinci Resolve vs Premiere Pro for Documentaries
One is free and grew up in the color suite. The other has thirty years of editorial habits baked in. For documentary, the choice is closer than people think.

The Best Video Editing Software for Documentaries
Documentary editing is an organization problem before it's a creative one. The best software is the one that keeps a thousand hours of footage findable.
How to Transcribe Interviews Fast (Without Losing Your Mind)
The transcript is where the documentary starts to take shape. Get it right and the edit half-writes itself; get it wrong and you'll scrub tape for months.